I published a simple guide to create a simple corona tracker web app with react js some time back in this blog. It had a simple interface where you enter the country’s name on the input field and it will display the details like total covid cases, deaths, today’s reported cases, and also the country’s flag.
Check: Best courses to learn React JS for Free
Recently I got to learn about creating a discord bot with an awesome node js module called Discord.js. It is an awesome module that allows communicating with Discord API very easily. So I decided to create a simple bot for my demo server that serves the same purpose as my react web app.
In this blog post, I will share how you can also create a simple Discord bot that can provide the covid stats right into your server. This is meant to be for beginners and it is one of my first bots ever created. Before getting into the actual code, let me first talk about the requirements.
Requirements
To get started with creating your own discord bot with Discord.js, you’ll need to learn these things and also use the tools I’ve mentioned below.
- Node JS installed on your computer
- Code Editor (Recommended VS Code)
- Basic understanding of Node JS and JavaScript
Read:
- Best Free Courses To Learn JavaScript
- Learn Web Development for Free With Best Resources For Beginners
If you have these basic understandings and tools, you are ready to build your simple bot.
Creating the bot
First, we will create an application and add a bot to our server through the discord developers platform which will provide us a token so that we can code the actual bot.
Head over to the Discord Developer website and click on New Application.
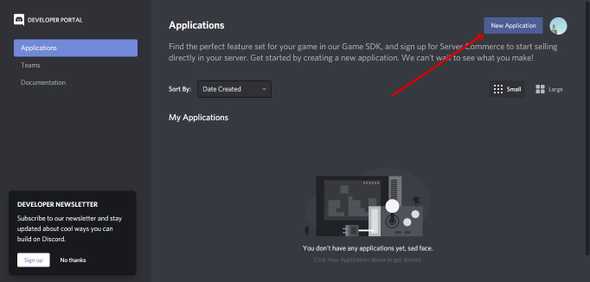
Provide a name for the application like “Covid Tracker App” and click Create.
It will redirect to a General Information page. Click on Bot from the left sidebar and then Add Bot button.
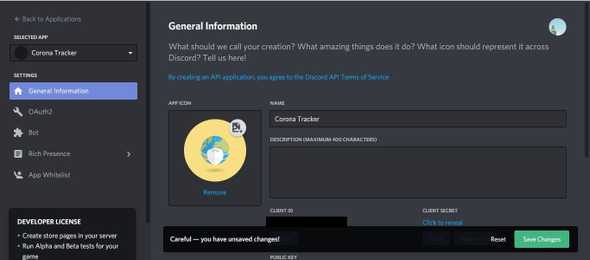
You’ll need to enter the bot Name on this page. This is the actual name of the bot that appears on any discord server.
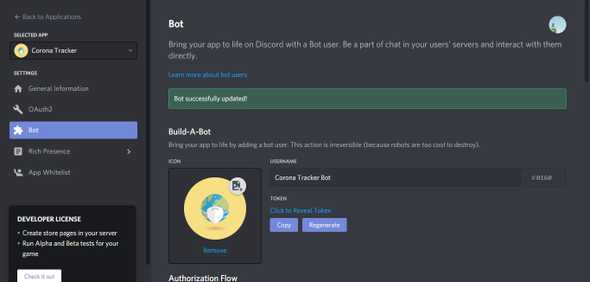
Copy the token below your bot’s name and save it somewhere safe. This token must be kept secret and you must never share it with anyone. It will be used to login and control your bot.
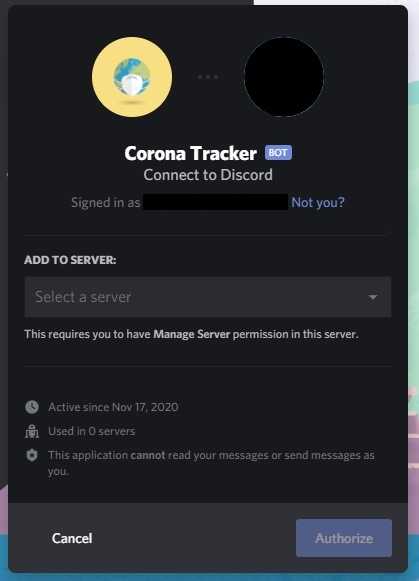
Next, click on OAuth2 from the left sidebar and choose “bot” from the scopes checklist. It will generate a URL below, copy the URL and paste it on your browser.
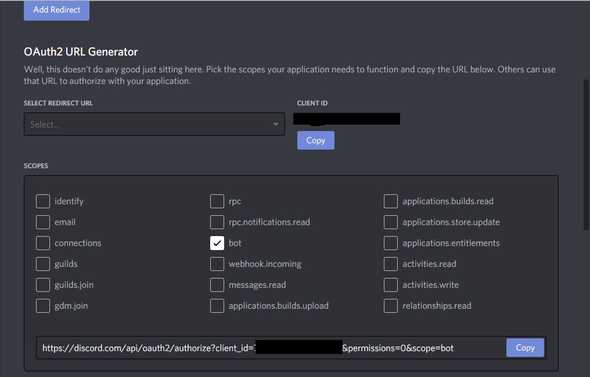
It will open a list of the servers where you have manager access permissions, select a server where you want to add the bot.
Understanding our Bot
Let’s first understand how our bot works in this section.
It is a simple bot that fetches the data for a particular country from an API and displays the stats inside your discord server.
I will use a free to use API that I used in my react tracker app as well.
https://corona.lmao.ninja/v2/countries
If you provide a country’s name at the end of this API, you’ll receive the data for that particular country.
So we will set a custom command which will trigger the bot and provide the country as an argument. The stats will be then provided by the bot in the reply.
Now let’s get our hands dirty with some code.
Let’s Code
To get into coding, you must have node installed in your machine first. You can download and install node from this official website here. It will also install npm on your machine.
To check if node and npm are installed correctly, open your terminal or command prompt then enter the following:
node --version
npm --version
If it displays the versions of node and npm, they are installed correctly. If it throws any errors, try installing node again as instructed above.
Then create a new directory where your bot will be located. I will name it corona-tracker-bot. Then open the folder in VS Code. Next, open the terminal and run npm init -y. It will create a package.json file in the folder. It will hold all our dependencies for the project and also define our main script file.
We will need to install Discord.js module into our app. Also we will require node-fetch module to fetch data from our API. We can install the required modules with the following command on the terminal.
npm i discord.js node-fetch
It will add node_modules folder to our root directory and also generate a packagelock.json file.
Then we will create our script file index.js where we will write the actual code for the bot.
First we will require Discord.js module on our index.js file so that we can use it on the app. Then we will create a new instance with the name client with the code as below. Also, we will store the secret token in the constant variable “token”. Then we can log in the bot with the command client.login(token).
The complete code will look like below if you follow all these steps.
const  Discord = require('discord.js');
const  client = new  Discord.Client();
const  token = "xxxxxxxxxxxx";
client.login(token)
We can run this code by running node index from the terminal on the root directory. If we run this code, our bot will already appear online. Just to make sure let me add a console.log whenever our bot is online. Add the following code for the purpose.
client.on('ready', () => {
console.log(`Logged in as ${client.user.tag}!`);
});
Now let’s create a custom command that will trigger the bot. It will be just a message that will enable the bot for the particular action. It is a good idea to initiate the command with some special characters like !, ? etc. I will use ! for this bot.
const PREFIX = '!';Next, we will split the commands provided after the prefix symbol and store it in an array args.
let args = message.content.substring(PREFIX.length).split(" ");If the first element of the array args i.e.(args[0]) is “corona”, we will trigger the bot.
The user must provide the country’s name as the second argument after the “corona” command. If no second argument after the “corona” command is provided, it will reply an error message to the user. Else the second argument is stored in the “country” variable and passed into the URL as template literal.
cliet.on('message', message => {
	let  args = message.content.substring(PREFIX.length).split(" ");
	 let country;
	 if (args[0] === 'corona') {
		if (!args[1]) {
		message.reply("Please supply a valid country in the format `!corona [country]` ");
		} else {
			country = args[1]
			const url = `https://corona.lmao.ninja/v2/countries/${country}`
		}
		})
Then the API is fetched for data. This is where we use node-fetch module. To use this module, we need to require it in the beginning of the index.js file and store it in fetch constant.
const fetch = require(‘node-fetch’)
Then corona stats are fetched as below. Add this code on the else block above.
fetch(url)
	.then(res => res.json())
	.then(data => {
		if (data.message) {
		message.reply(data.message)
		}else {
		message.reply(`
		Country: ${data.country}
		Total Cases: ${data.cases}
		Total Deaths: ${data.deaths}
		Active Cases: ${data.active}
		Today Cases: ${data.today}
		`)}
If you enter an invalid country or if the country has no cases, it will provide a JSON with just “message” key. In the case of a valid country, it will provide valid stats. Then the command is replied with stats as listed on the template literals.
You can now start your node app as node index. It will show your bot as online and if you provide !corona nepal on any of your channels on the server where you added the bot, it will provide the details as mentioned on the template literals.
If you want to see the bot in action, check out my Demo Discord Server and head over to #corona channel where you can use the commands to get the corona stats for any country. I have implemented Embeds for this bot, added a display picture and also added help command.
I hope this simple guide will help you create your first simple Discord bot with node js and Discord.js. Don’t forget to share your bots in the comment section below.
